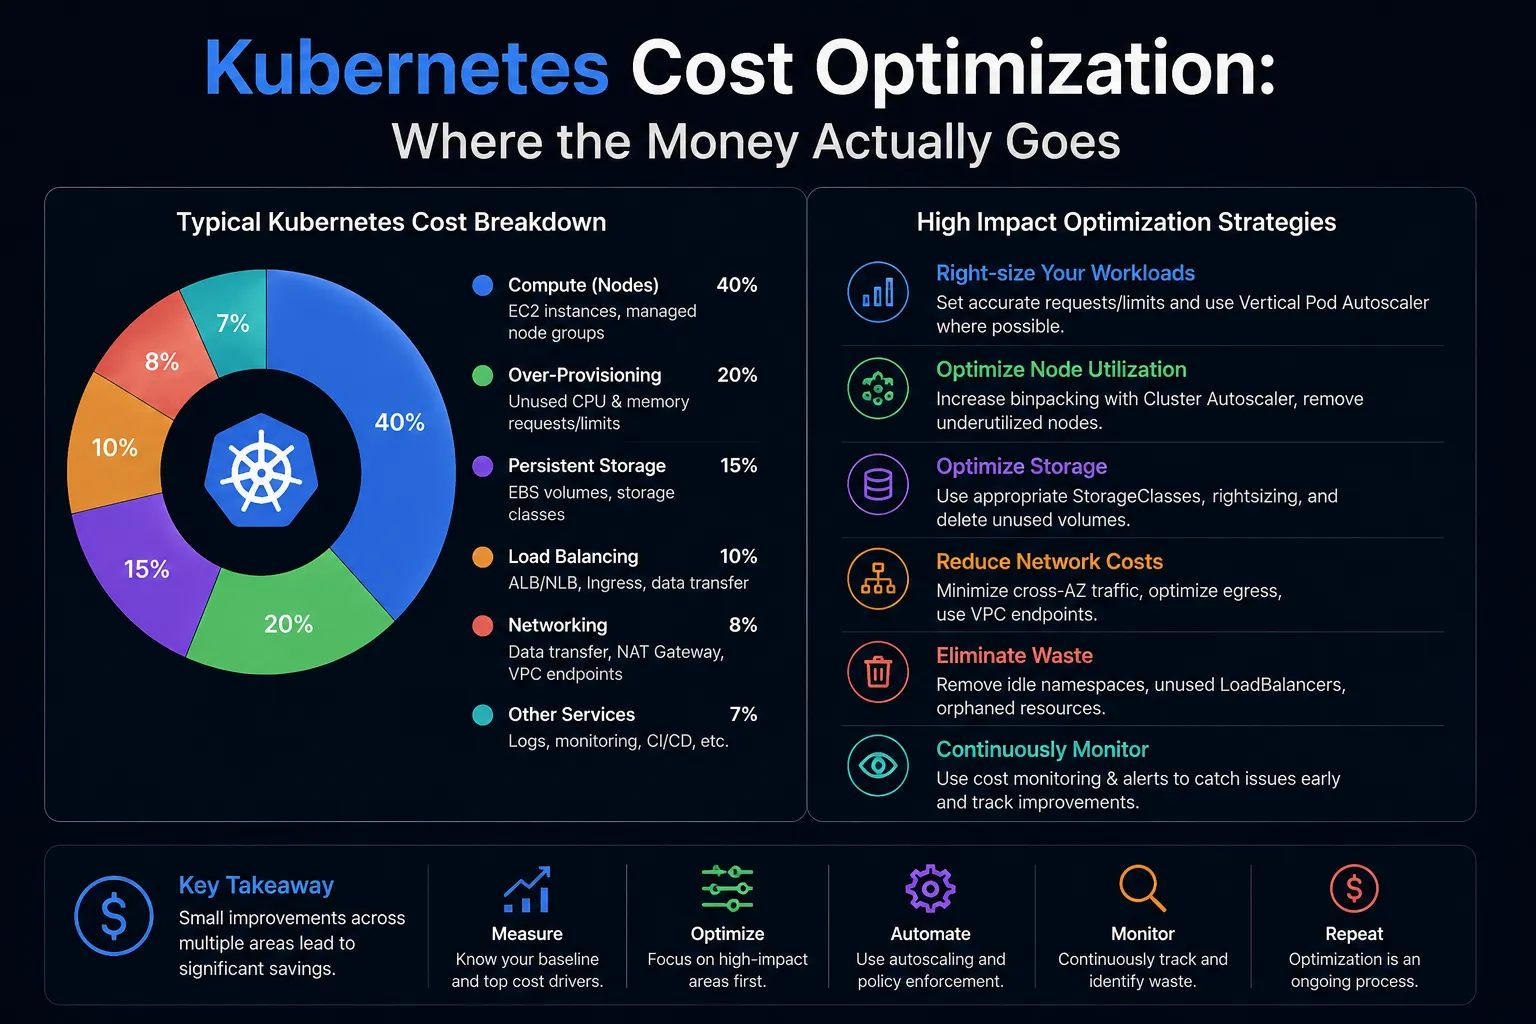
Kubernetes clusters are expensive to run well and even more expensive to run thoughtlessly. The most common pattern: teams provision generous resource requests to avoid OOMKills and throttling, nodes run at 20% average utilization, and the cloud bill is three times what it needs to be. The waste is invisible because nothing is broken—applications run fine, nobody gets paged, and the cost gets treated as the cost of reliability.
It isn’t. Kubernetes cost optimization is primarily a configuration problem, not an architecture problem. Here’s where to look.
Understanding Where the Cost Comes From
Kubernetes cluster costs have four components:
Node compute: The EC2/VM instances running your workloads. This is almost always the largest cost center—typically 60–80% of total cluster spend.
Control plane: Managed Kubernetes control plane fees ($73/month/cluster on EKS and GKE). Significant at small cluster counts; negligible at scale.
Networking: Cross-AZ data transfer, load balancer hours, NAT gateway fees. Often 10–20% of total cost and frequently ignored.
Storage: Persistent volume costs (EBS, PD, Azure Disk). Relevant for stateful workloads.
The optimization opportunity is heavily concentrated in node compute, so that’s where to start.
The Utilization Problem
Node utilization in most production Kubernetes clusters runs 15–30% for CPU and 20–40% for memory. The gap between what’s allocated (resource requests) and what’s actually used is where the money goes.
Why requests are overprovisioned:
- Developers set requests at “what the app might need at peak” rather than typical usage
- Teams copy resource settings from similar services without measuring actual usage
- Fear of OOMKills or throttling leads to conservative buffers
- Resource requests are never reviewed after initial deployment
The Kubernetes scheduler places pods on nodes based on requested resources, not actual usage. A pod requesting 2 CPU but using 0.3 CPU has “reserved” 2 CPU on its node—those CPU cycles are unavailable for other pods even though they’re idle.
Step 1: Measure Before Cutting
Before changing anything, understand your actual utilization. For each namespace, look at:
- CPU requested vs. CPU used (last 30 days)
- Memory requested vs. memory used (last 30 days, including peak)
- Node utilization across the cluster
Tools:
- kubectl top pods/nodes: Instant view of current resource consumption
- Prometheus + Grafana: Historical utilization; the
kube_pod_resource_requestsvs.container_cpu_usage_seconds_totalmetrics show the gap - Goldilocks (open source from Fairwinds): Runs VPA in recommendation mode and surfaces right-sizing suggestions per workload
- Kubecost: Open source cost allocation with per-namespace and per-workload breakdowns, shows actual spend per team
Never right-size from current utilization alone—use the 95th percentile over 30 days. The headroom above p95 is your buffer; cutting memory below p95 guarantees OOMKills.
Step 2: Right-Size Resource Requests
The goal is to set requests at roughly p75–p95 of actual usage, with limits set higher to allow bursting.
For CPU: CPU throttling (hitting the limit) degrades performance but doesn’t kill the pod. Setting CPU limits higher than requests (or not setting them at all) allows pods to burst during traffic spikes without starving other pods of their allocations.
For memory: Memory limits kill the pod (OOMKill) when exceeded. Set memory requests at p95 of observed usage; set limits 10–20% above requests as a safety buffer. Don’t set limits dramatically higher than requests—it’s just moving the overprovisioning to limits.
Vertical Pod Autoscaler (VPA) can automate request right-sizing in recommendation mode: it observes actual usage and suggests appropriate request values. In auto mode, it updates requests live (which requires pod restarts). Most teams use VPA in recommendation mode and apply changes during maintenance windows.
Typical outcome of right-sizing: 20–40% reduction in cluster node count with no change in application behavior.
Step 3: Node Autoscaling
Cluster Autoscaler (CA) and Karpenter are the two options for automatically adjusting node count to match workload demand.
Cluster Autoscaler scales predefined node groups up (when pods are unschedulable) and down (when nodes are underutilized). It works with managed node groups and Auto Scaling Groups. The limitation: you define node groups with specific instance types, and CA works within those groups. If your smallest node group uses m5.xlarge instances, CA never provisions smaller instances for small pods.
Karpenter is a newer autoscaler (originally from AWS, now CNCF) that provisions nodes dynamically based on the actual pod requirements—choosing the best instance type and size for the pending pods at that moment. It can mix spot and on-demand, select instance families based on current pricing, and consolidate underutilized nodes aggressively. Karpenter’s bin-packing efficiency typically produces 20–30% better utilization than CA.
For teams on EKS, Karpenter is now the recommended approach. For teams on GKE, GKE Autopilot provides similar dynamic node provisioning managed by Google. AKS users should evaluate the Node Autoprovisioning preview.
Step 4: Spot Instances
Spot instances (AWS) / Preemptible VMs (GCP) / Spot VMs (Azure) run at 60–90% discount with the risk of termination with 2-minute notice. For stateless, reschedulable workloads, this is the highest-leverage cost lever in your cluster.
What works well on spot:
- Stateless application pods with graceful shutdown handling
- CI/CD build workers
- Batch processing jobs
- Development and staging environments (100% spot acceptable)
What doesn’t work on spot:
- Stateful workloads without fast state recovery
- Anything where pod termination causes a user-visible incident
- System components (CoreDNS, kube-proxy, node agents)
The practical approach: run a mixed node pool with a small on-demand baseline (enough capacity to handle normal traffic if all spot is reclaimed) and spot nodes handling the surge and batch workloads. Karpenter makes mixed on-demand/spot pools easy to manage—it automatically falls back to on-demand if spot capacity is unavailable.
Cluster-level spot adoption: Even a 50% spot mix with a 70% discount on those nodes reduces compute costs by 35%. Most teams can achieve 60–70% spot ratio on stateless workloads.
Step 5: Instance Type Selection
Many clusters default to general-purpose instance types (m5, n2-standard) without evaluating whether the workload profile fits.
- Compute-heavy workloads (ML inference, video processing, cryptography): c5/c6i (compute-optimized) at lower $/vCPU
- Memory-heavy workloads (in-memory databases, JVM services with large heaps): r5/r6i (memory-optimized) gives more RAM per dollar
- Most web/API workloads: General-purpose is correct; but evaluate whether you’re using the right generation (m6i is cheaper than m5 for the same spec)
Karpenter selects from instance types you specify; giving it a broad set of instance families lets it optimize for current spot pricing and availability.
Step 6: Cross-AZ Traffic
In multi-AZ clusters, pod-to-pod traffic crossing availability zone boundaries incurs data transfer costs ($0.01/GB on AWS—small per request, significant at scale). A service handling 10TB/month of cross-AZ traffic costs $100/month purely in network fees.
Mitigation options:
- Topology Aware Routing: Kubernetes feature that prefers routing to endpoints in the same zone. Enable with
service.kubernetes.io/topology-mode: autoannotation. - Pod affinity rules: Schedule pods that communicate frequently in the same zone
- Service mesh locality-aware routing: Istio and Linkerd support zone-preferred routing policies
Cross-AZ cost is frequently overlooked but can be 10–15% of total cluster spend for services with high internal traffic volume. For broader cloud cost accountability practices, see FinOps fundamentals.
Putting It Together: A Prioritized Checklist
- Measure utilization (Kubecost or Goldilocks + Prometheus) — understand the gap before changing anything
- Right-size requests — biggest single lever, typically 20–40% node reduction
- Enable Karpenter with mixed on-demand/spot node pools
- Review instance families — ensure you’re on current-gen instances
- Enable Topology Aware Routing — reduce cross-AZ transfer costs
- Set up VPA in recommendation mode — ongoing right-sizing signal
- Review persistent volumes — delete orphaned PVs, right-size storage classes
Teams that work through this list systematically typically reduce cluster spend by 40–60% without architectural changes and without compromising reliability.